Hellooooo Dolls,
Misses Galore! wooooooow, i cant believe it!i cant believe it!wooooooow! 5560 views. i'am so excited. Thank you soooo much lovely people, i count this as a great blessing. Keep passing by i promise whenever i find time i will be posting cool stuff for you. Happy Holidays, and as we head towards the end of the year, take some time and reflect on how amazing God as been and give thanks, very important.
Misses Galore! wooooooow, i cant believe it!i cant believe it!wooooooow! 5560 views. i'am so excited. Thank you soooo much lovely people, i count this as a great blessing. Keep passing by i promise whenever i find time i will be posting cool stuff for you. Happy Holidays, and as we head towards the end of the year, take some time and reflect on how amazing God as been and give thanks, very important.

Well, Personally i'm so grateful for life, good health, and God's Unconditional love. He has been very faithful to me for this and much more i say THANK YOU ALMIGHTY GOD. i mean, my son turned One #proudMummy, what more to ask for. Blessing right left and centre. I am so beyond grateful i know i cant stop saying this , but hey, its the truth. Thanks to my amazingly good friends who have made this year memorable and my lovely family love you always.
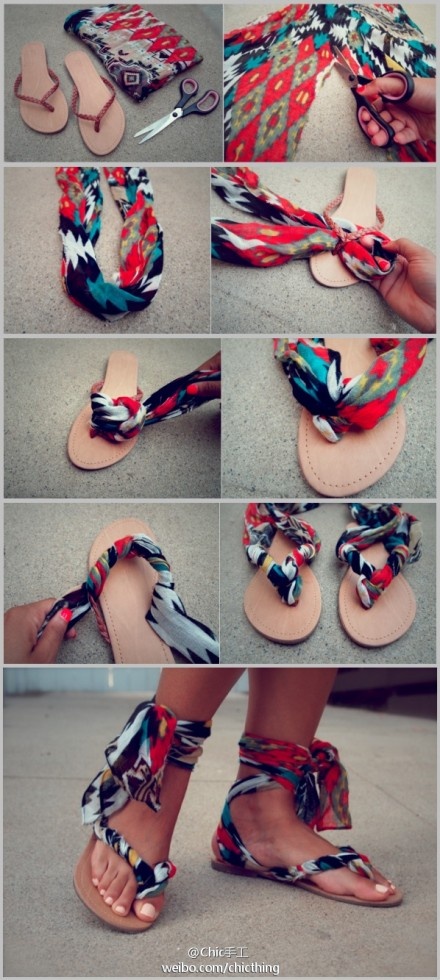
Now that Christmas is around the corner, i know most of us are wondering what to wear to all the holiday parties. oh well , let me make your work easier with some cool ideas.Take a look.


Love
Phyl
xoxo


 When you are painting the edges you can easily push the mixture back with your nail if it gets out of line. You can also clean it off the shoes easily if you catch it quickly.

 Love
Love